实验 7:可变树
截止时间:7 月 21 日(星期二)晚上 11:59。
起始文件
下载 lab07.zip.
出勤要求
要获得实验课学分,除了到场参加实验课外,你还需要提交实验题目。
如果你因合理原因(例如生病或时间冲突)缺席实验课,或者由于某种原因未能完成签到,请在一周内发送邮件至 cs61a@berkeley.edu ,以补记出勤学分。
必做题
可变树
如果你需要复习可变树,可以阅读本节。也可以直接开始做题,遇到困难时再回来查阅。
可变树
一个 Tree 实例有两个实例属性:
label是存储在树根处的值。branches是一个由Tree实例组成的列表,这些实例保存树中其余部分的标签。
这个 Tree 类的定义如下(省略了 __repr__ 和 __str__ 方法):
class Tree:
    """A tree has a label and a list of branches.

    >>> t = Tree(3, [Tree(2, [Tree(5)]), Tree(4)])
    >>> t.label
    3
    >>> t.branches[0].label
    2
    >>> t.branches[1].is_leaf()
    True
    """
    def __init__(self, label, branches=[]):
        self.label = label
        for branch in branches:
            assert isinstance(branch, Tree)
        self.branches = list(branches)

    def is_leaf(self):
        return not self.branches
要构造一个 Tree 实例,给定标签 x (可以是任意值)以及分支列表 bs (由 Tree 实例组成),并将它命名为 t,可以这样写: t = Tree(x, bs).
对于树 t:
- 根标签可以是任意值,表达式
t.label的求值结果就是这个标签。 - 它的分支始终是
Tree实例,而t.branches求值得到由这些分支组成的 列表 。 t.is_leaf()会返回True,如果t.branches为空;否则返回False。- 要构造标签为指定值的叶节点:
x,可以这样写:Tree(x).
显示一棵树 t:
repr(t)会返回一个 Python 表达式,对它求值可得到一棵等价的树。str(t)会让每个标签各占一行;子节点显示在父节点下方,并比父节点多缩进一级。
>>> t = Tree(3, [Tree(1, [Tree(4), Tree(1)]), Tree(5, [Tree(9)])])

>>> t         # displays the contents of repr(t)
Tree(3, [Tree(1, [Tree(4), Tree(1)]), Tree(5, [Tree(9)])])

>>> print(t)  # displays the contents of str(t)
3
  1
    4
    1
  5
    9
修改(也称为改变)一棵树 t:
t.label = y会把t的根标签改为y(可以是任意值)。t.branches = ns会把它的分支改为指定的t的根标签改为ns(由Tree实例列表)。- 对
t.branches的修改会改变t。例如,t.branches.append(Tree(y))会添加一个标签为y的叶节点,并把它放在最右侧。 - 修改其中任意一个分支也会改变原树;例如,
t的修改会改变t。例如,t.branches[0].label = y会把最左侧分支的根标签改为y.
>>> t.label = 3.0
>>> t.branches[1].label = 5.0
>>> t.branches.append(Tree(2, [Tree(6)]))
>>> print(t)
3.0
  1
    4
    1
  5.0
    9
  2
    6
下面总结了用函数式抽象实现树与用类实现树的区别:
| - | 树的构造函数与选择函数 | 树类 |
|---|---|---|
| 构造树 | 给定标签 label 以及由 branches组成的列表时,调用 tree(label, branches) |
给定标签和分支列表时,要构造树对象,调用 label 以及由 branches组成的列表时,调用 Tree(label, branches) (这会调用 Tree.__init__ 方法)。 |
| 标签与分支 | 要分别取得树 t组成的列表时,调用 label(t) 或 branches(t) 的标签或分支,分别调用 |
要分别取得树 t,则分别访问实例属性 t.label 或 t.branches 。 |
| 可变性 | 函数式树数据抽象是不可变的(除非破坏其抽象屏障),因为我们不能给调用表达式赋值 | 这个 label 和 branches 而 Tree 实例的属性可以重新赋值,从而改变这棵树。 |
| 判断树是否为叶节点 | 要判断树 t 是否为叶节点,可以调用函数 is_leaf(t) |
要判断树 t 是否为叶节点,可以调用方法 t.is_leaf()。这个方法只能在 Tree 对象上调用。 |
树的可视化
如果希望借助工具观察树的结构,请前往 code.cs61a.org,选择 启动 Python 解释器,然后调用 autodraw().
问题 1:最大路径和
编写一个函数,接收一棵树,返回从根节点到任意叶节点的所有路径中,节点值之和的最大值。
def max_path_sum(t):
    """Return the maximum path sum of the tree.

    >>> t = Tree(1, [Tree(5, [Tree(1), Tree(3)]), Tree(10)])
    >>> max_path_sum(t)
    11
    """
    "*** YOUR CODE HERE ***"
使用 Ok 测试你的代码:
python3 ok -q max_path_sum问题 2:添加叶节点
实现 add_d_leaves,它接收一个 Tree 实例 t 以及一个数 v.
我们把树 t 中某个节点的深度定义为从根到该节点所经过的边数,因此根节点的深度为 0。
对于树中的每个节点,应当为它添加 d 个叶节点,其中 d 是该节点的深度。每个新增叶节点的标签都应为 v。如果该深度的节点已有分支,请把这些叶节点追加到分支列表末尾。
例如,应当为深度为 1 的每个节点添加 1 个标签为 v 的叶节点,为深度为 2 的每个节点添加 2 个,依此类推。
下面左侧是一棵示例树 t ,右侧是对它调用 add_d_leaves 且参数 v 取 5 后的结果。
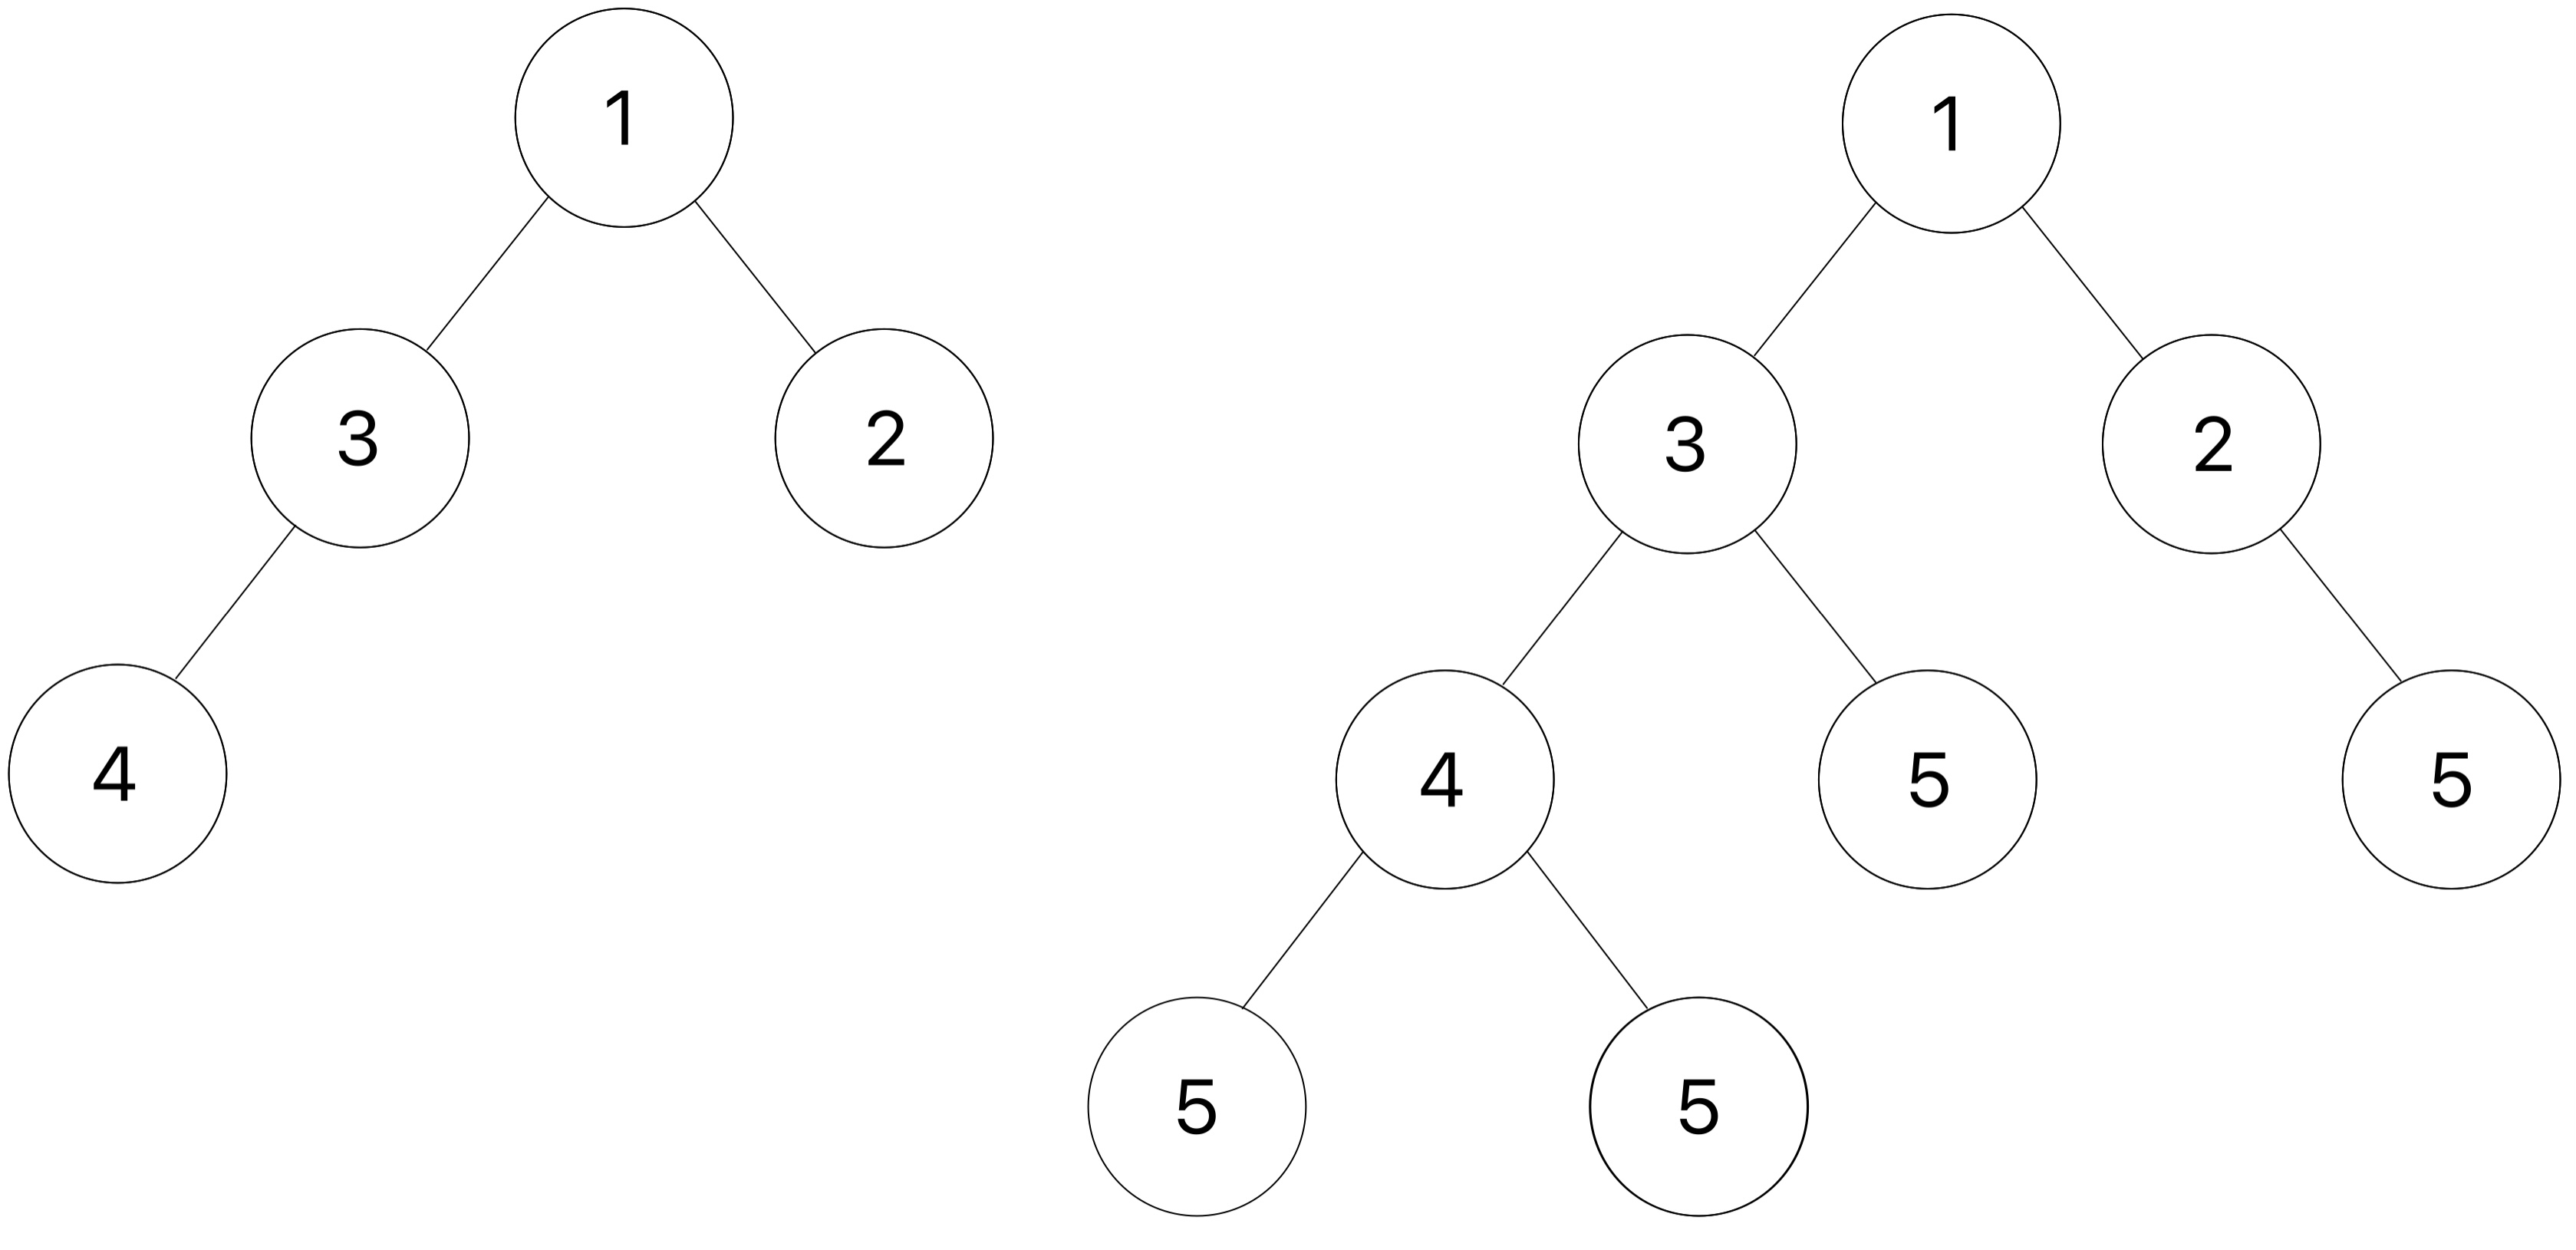
Hint: 使用辅助函数记录当前深度!
Hint: 请留意添加新叶节点的时机。我们只想给原树中的节点添加叶节点,不要再给刚添加的节点继续添加。
阅读下面的 doctest,并尝试画出第二个示例,以直观看清函数如何改变
t3.
def add_d_leaves(t, v):
    """Add d leaves containing v to each node at every depth d.

    >>> t_one_to_four = Tree(1, [Tree(2), Tree(3, [Tree(4)])])
    >>> print(t_one_to_four)
    1
      2
      3
        4
    >>> add_d_leaves(t_one_to_four, 5)
    >>> print(t_one_to_four)
    1
      2
        5
      3
        4
          5
          5
        5

    >>> t0 = Tree(9)
    >>> add_d_leaves(t0, 4)
    >>> t0
    Tree(9)
    >>> t1 = Tree(1, [Tree(3)])
    >>> add_d_leaves(t1, 4)
    >>> t1
    Tree(1, [Tree(3, [Tree(4)])])
    >>> t2 = Tree(2, [Tree(5), Tree(6)])
    >>> t3 = Tree(3, [t1, Tree(0), t2])
    >>> print(t3)
    3
      1
        3
          4
      0
      2
        5
        6
    >>> add_d_leaves(t3, 10)
    >>> print(t3)
    3
      1
        3
          4
            10
            10
            10
          10
          10
        10
      0
        10
      2
        5
          10
          10
        6
          10
          10
        10
    """
    "*** YOUR CODE HERE ***"
使用 Ok 测试你的代码:
python3 ok -q add_d_leaves问题 3:是否存在路径
编写函数 has_path ,接收一棵树 t 和一个字符串 target。如果存在一条从根节点出发的路径,并且沿途节点的内容恰好拼成 True ,则返回 target;否则返回 False 。可以假设每个节点的 label 都恰好是一个字符。
这种数据结构称为字典树(trie),有许多很实用的用途,例如自动补全。
def has_path(t, target):
    """Return whether there is a path in a Tree where the entries along the path
    spell out a particular target.

    >>> greetings = Tree('h', [Tree('i'),
    ...                        Tree('e', [Tree('l', [Tree('l', [Tree('o')])]),
    ...                                   Tree('y')])])
    >>> print(greetings)
    h
      i
      e
        l
          l
            o
        y
    >>> has_path(greetings, 'h')
    True
    >>> has_path(greetings, 'i')
    False
    >>> has_path(greetings, 'hi')
    True
    >>> has_path(greetings, 'hello')
    True
    >>> has_path(greetings, 'hey')
    True
    >>> has_path(greetings, 'bye')
    False
    >>> has_path(greetings, 'hint')
    False
    """
    assert len(target) > 0, 'no path for empty target.'
    "*** YOUR CODE HERE ***"
使用 Ok 测试你的代码:
python3 ok -q has_path问题 4:前序遍历
定义函数 preorder,它接收一个 Tree 实例,并按照打印这棵树时标签出现的顺序,返回包含所有标签的列表。
下图展示节点的打印顺序,箭头表示函数调用。
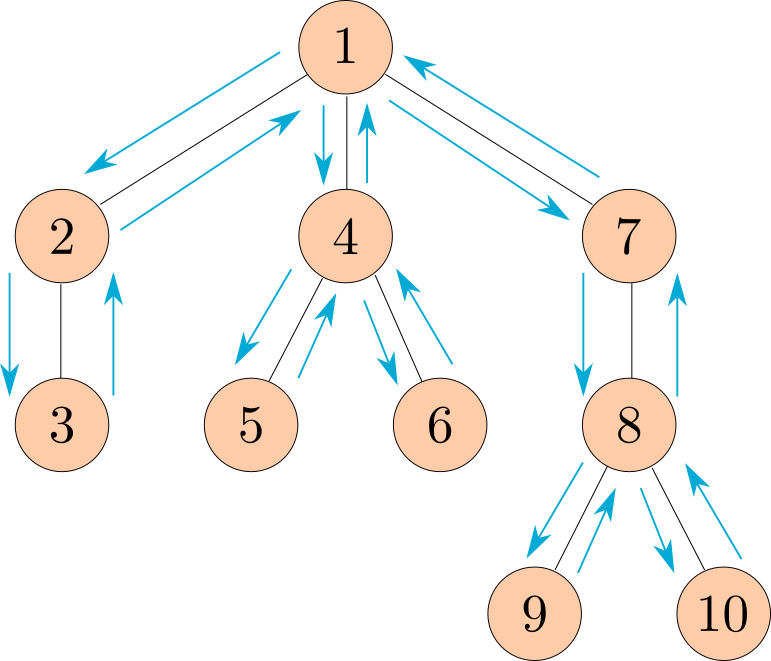
树中节点的这种排列顺序称为前序遍历。
def preorder(t):
    """Return a list of the entries in this tree in the order that they
    would be visited by a preorder traversal (see problem description).

    >>> numbers = Tree(8, [Tree(2), Tree(9, [Tree(4), Tree(5)]), Tree(6, [Tree(7)])])
    >>> print(numbers)
    8
      2
      9
        4
        5
      6
        7
    >>> preorder(numbers)
    [8, 2, 9, 4, 5, 6, 7]
    """
    "*** YOUR CODE HERE ***"

class Tree:
    """A tree has a label and a list of branches.

    >>> t = Tree(3, [Tree(2, [Tree(5)]), Tree(4)])
    >>> t.label
    3
    >>> t.branches[0].label
    2
    >>> t.branches[1].is_leaf()
    True
    """
    def __init__(self, label, branches=[]):
        self.label = label
        for branch in branches:
            assert isinstance(branch, Tree)
        self.branches = list(branches)

    def is_leaf(self):
        return not self.branches

    def __repr__(self):
        if self.branches:
            branch_str = ', ' + repr(self.branches)
        else:
            branch_str = ''
        return 'Tree({0}{1})'.format(repr(self.label), branch_str)

    def __str__(self):
        return '\n'.join(self.indented())

    def indented(self):
        lines = []
        for b in self.branches:
            for line in b.indented():
                lines.append('  ' + line)
        return [str(self.label)] + lines
使用 Ok 测试你的代码:
python3 ok -q preorder问题 5:按层改变链表
回顾一下:节点的深度是从根到该节点所经过的边数。因此根节点自身的深度为 0,因为根到自身不经过任何边。
给定一棵树 t 以及一个由单参数函数组成的链表 funcs,请编写函数,使用 t 中相应深度的函数改变 funcs 对应深度处的标签。例如:
- 根节点(深度 0)的标签使用链表深度 0 处的函数改变
funcs(funcs.first). - 树第一层的标签使用链表深度 1 处的函数改变
funcs(funcs.rest.first),依此类推。
链表中的每个函数 funcs 都接收一个标签值,并返回一个有效的标签值。
如果某个节点是叶节点,而链表中仍有尚未使用的函数, funcs则应把剩余函数全部 按顺序 应用到该叶节点的标签上。如果 funcs 为空,树应保持 不变.
示例请参阅 doctest。
def level_mutation_link(t, funcs):
	"""Mutates t using the functions in the linked list funcs.

	>>> t = Tree(1, [Tree(2, [Tree(3)])])
	>>> funcs = Link(lambda x: x + 1, Link(lambda y: y * 5, Link(lambda z: z ** 2)))
	>>> level_mutation_link(t, funcs)
	>>> t    # At level 0, apply x + 1; at level 1, apply y * 5; at level 2 (leaf), apply z ** 2
	Tree(2, [Tree(10, [Tree(9)])])
	>>> t2 = Tree(1, [Tree(2), Tree(3, [Tree(4)])])
	>>> level_mutation_link(t2, funcs)
	>>> t2    # Level 0: 1+1=2; Level 1: 2*5=10 => 10**2 = 100, 3*5=15; Level 2 (leaf): 4**2=16
	Tree(2, [Tree(100), Tree(15, [Tree(16)])])
	>>> t3 = Tree(1, [Tree(2)])
	>>> level_mutation_link(t3, funcs)
	>>> t3    # Level 0: 1+1=2; Level 1: 2*5=10; no further levels, so apply remaining z ** 2: 10**2=100
	Tree(2, [Tree(100)])
	"""
	if _____________________:
		return
	t.label = _____________________
	remaining = _____________________
	if __________________:
		while _____________________:
			_____________________
			remaining = remaining.rest
	for b in t.branches:
		_____________________
使用 Ok 测试你的代码:
python3 ok -q level_mutation_link在本地检查得分
你可以运行以下命令,在本地检查本次作业每道题的得分:
python3 ok --score这不会提交作业! 确认得分符合预期后,请将作业提交到 Gradescope,以获得作业学分。
提交作业
请上传所有你修改过的文件,将本次作业提交到 对应的 Gradescope 作业入口。 实验 00 中提供了详细说明。
正确完成所有题目可得 1 分。 Please ensure your TA has taken your attendance before leaving.
